Showing posts with label Learning. Show all posts

Tuesday, March 18, 2014

And Because I Couldn't Keep it to Just One Slice...

I had to make a chalk board for the kitchen!


Same type and brand of wood slice as the mirror, but with no carving or glueing required. I really liked the look of a perfect circle inside the organic wood shape and sized out my plate collection until I found one that fit just right as a guide for my circle. Leaning against the edge of the plate I drew out the circle. Then I hand painted the shape with a brush and chalkboard paint. I have a pretty steady hand so I didn't tape off the edge of the circle, but if you'd like to, you can use electrical tape or another type of tape that is flexible so it'll follow a round line. I especially recommend this if you use spray paint, but remember to also cover the edges of the actual slice you don't get the spray paint outside the intended shape. The paint brand suggested using two or more coats so I went with four total (waited at least an hour between coats) and let it set for 24 hours. I recommend not sanding between coats because the chalk paint with begins staining the wood. I attached the same type of black suede strap as the mirror, but with copper nails instead of brass. I actually just cut that strap in half when I made the mirror so I had the other half left. I used mineral oil to condition the wood then hung it up. It's hanging above my coffee bar and I'm always looking for moments to celebrate my heritage so it seemed appropriate to go with "coffee with milk" in spanish.

Tuesday, March 11, 2014

Anthro Mango Slice Mirror DIY

Anthropologie Mango Slice Mirror


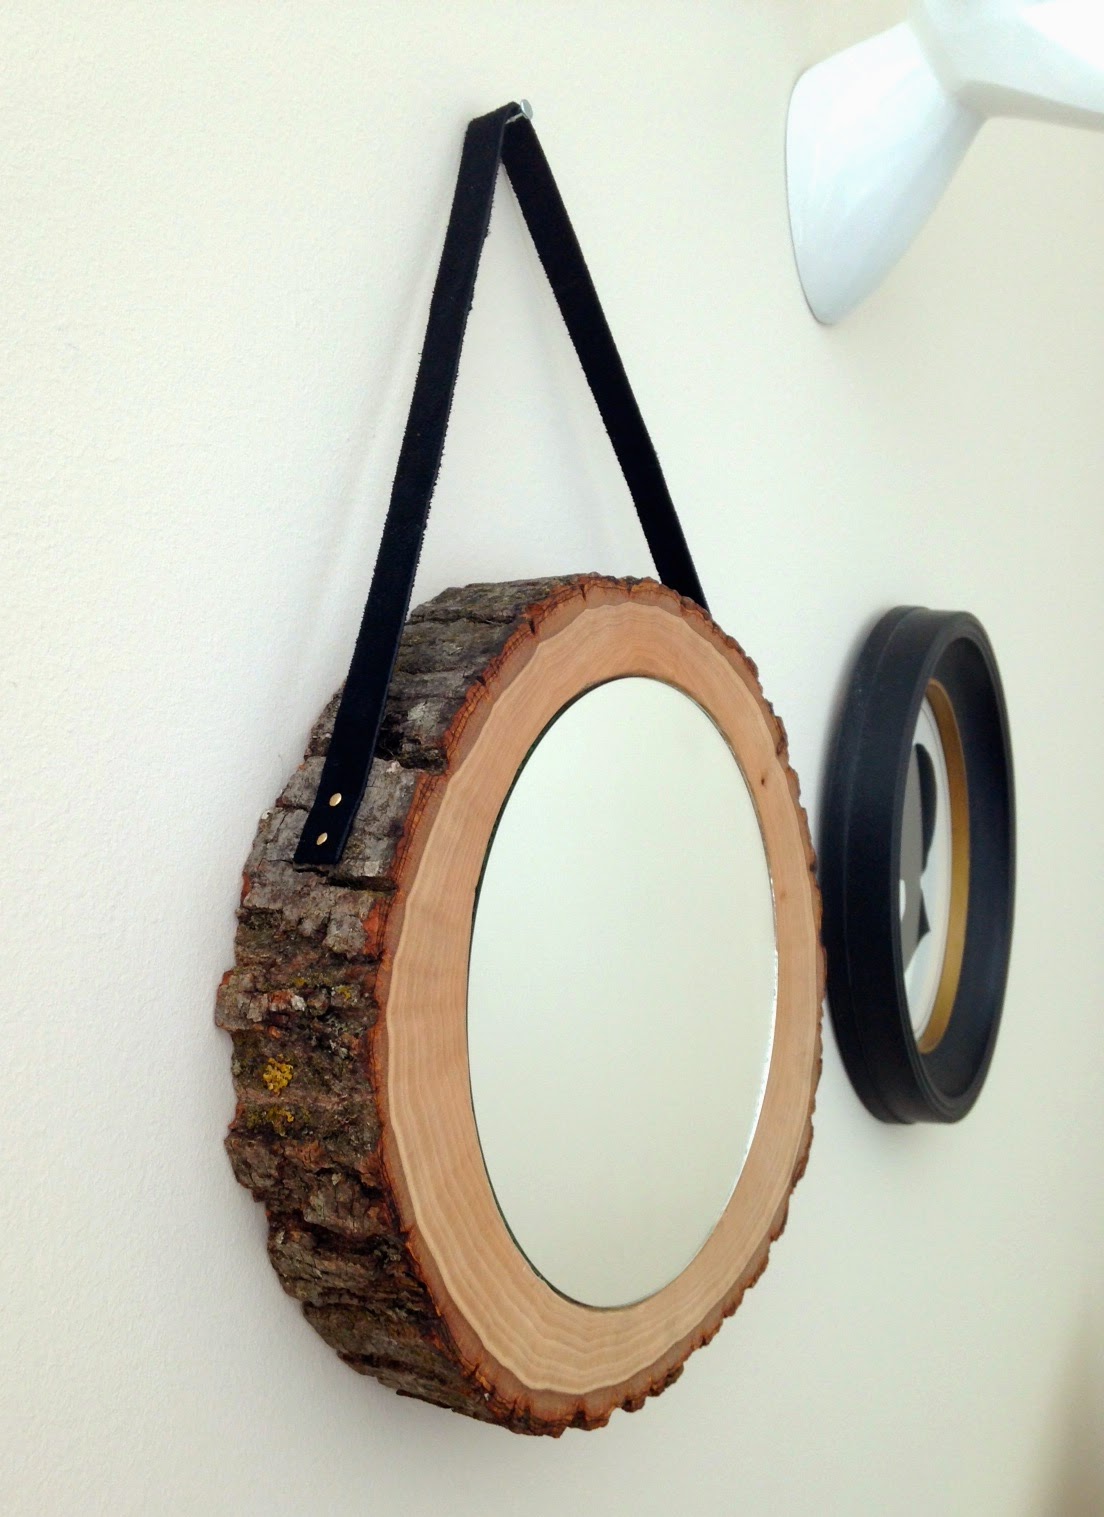
Cristina's Wood "Looked Softer and More Carve-able Than It Was" Slice Mirror made with lots of love and frustration


As per the usual, I found something awesome at Anthro, but still don't have enough income (got a job but just started--woohoo!) to invest it in a random home decor item. This was particularly sad because it was even on saleThe Mango Slice Mirror haunted me just enough to get me to try to make it! 

I already owned a slice of wood, courtesy of a random Michael's trip from way-back-when, just not the right kind so I went back to Michael's (a dangerous field trip when you don't have much money) and picked up a more appropriately sized wood slice and 7" mirror for less than $3.00. Thank goodness for coupons. Then I found some adorable nails in copper and brass for less then $1.75 a pack of 30 at Ace Hardware which I'll obviously use on other projects as well. Found the suede leather strap on a separate trip to Michaels (again, super dangerous). Aaaaaand and I was ready to go!

Living in a condo leaves me with limited power tool-type resources. As in, I can't use them. Also, I don't own any (not my choice). That, along with my mom having borrowed my Dremel, left me with one choice: carve out the area where the mirror will go. I'll admit, this is crazy. I do not recommend it. I'd prefer a wham-bam option, but I haven't been able to come up with one so in the spirit of making it happen, I moved along with carving out the shape to inset the mirror. I placed the mirror on the wood slice to use it as a template and make sure I was happy with the placement. The mirror isn't perfectly centered which I like. Once I traced the mirror shape onto the slice, I started by carving from the outside in until I had the right depth and size to fit the mirror so that it looked like one solid piece. 

Once the carving was done, I gave the edges a good sand and lathered on some mineral oil to condition the wood. Before adding the mirror, I attached the leather step using a hammer and the brass nails (size 3/4 x 17) I bought at Ace Hardware. After reading maybe a million glue and mirror forums (ok, like 7 or 8) I decided to go with hot glue. I figured if it ruined the silver mirror film, I'd replace it. I'm considering using a longer strap, but it's done for now.

And voila!


It ended up becoming a part of a small vignette happening on my bedroom wall.

Thursday, November 7, 2013

Exploring Florida Once Again

A couple of weeks ago I went to visit some family in central Florida and discovered some lovely towns: Micanopy, Ocala and Tavares. And I mean old-americana kind of lovely. On Saturday we visited Coon Hollo in Micanopy which is about 30 minutes north of Ocala. Coon Hollo this adorable outdoor fall festival. They had a corn maze, fair games, a hay ride where you get to feed cows and an assortment of other games and play areas for kids. It was very cute and like nothing I had ever seen before. In Miami we may have a few pumpkin patches (tents set up on an empty lot with a lot of pumpkins lined out for you to choose from) and festivals of different kinds but I had never seen anything like this. I won't claim to have seen everything there is to see in Miami, but I've been here for over twenty years so generally, if it's in Miami, I would hope that I've probably heard of it. I'm not unfamiliar with farm animals though as we do have cow and horse pastures in more rural areas and I have been to quite a few zoos and the like.

A happy Micanopy cow

The next day, we traveled to Tavares which is about 20 minutes east of Ocala. I'm referencing Ocala because it's the largest town in the area where we were staying. The morning mission was to ride the Orange Blossom Cannonball, a 100+ year old train that's been featured in many movies, new and old. They told a Halloween story, gave a magic show and all the children got treats. The actual train ride was about 40 minutes long and we didn't get off, but I heard that during past Christmas rides, patrons got off the train and visited a magical Christmas village. Sounds too cute.  

The Orange Blossom Cannonball

After the ride, a few folks stayed behind so the kids could play in the most elaborate treehouse-looking play park. Wished I was 6 again just to get in on that action. It looked very cool. We drove back through the scenic rural roads and once we got back, I helped set up for a Halloween party. We made mummy dogs and taco salad. Once those were done, I left to get ready for mine and my boyfriend's debut as a dapper cat and mouse pair. He decided I should be the cat. I'm still figuring that one out. 

Hope you had a great Halloween holiday!

Monday, September 23, 2013

Chair Love: Final

It was fun while it lasted! Here's the transition from dirty, old and rescued office chair to an awkward in-between state to the happy polka dot stunner below.


Thursday, September 19, 2013

Chair Love: Update

So the chair is almost finished. We got as far as we could go with no technical training on this type of reupholstering situation. The final step is to attach the back panel which covers all the remaining side seams and back of the chair. When we took the chair apart we discovered that what was holding this back panel up was some kind of metal contraption that my mom described as looking like a spine that clamps the fabric and creates a perfect edge. When we got to the step where we had to put it back on with the new fabric, we couldn't figure out how to do it without wanting to jump in a lake full of piranhas. We called a friend of my mother's that works as a carpenter for a large American furniture company to see what she thought we should do (this is after I first consulted with the omnipotent google and youtube). She said that because the back of the chair is curved, the only way to put that piece on was to use the metal contraption. She also volunteered to give us a new roll so we could start fresh or install it herself. Well, I jumped at the chance to have someone else do it especially because she said that it'd be so easy for her to do it that it'd only take 30 minutes. That sounded amazing considering the fact that my mom and I had spent about 16 hours on the whole project already. This dream-come-true ending to our chair love story doesn't come without a snag. My birthday party is on Saturday. Sunday, as usual, comes after Saturday. Clearly this equation sucks. But, as long as we don't have to figure it out ourselves, it's cool. Final photos will be up next week along with a discussion on where the chair should go; I was thinking the bedroom, but it just looks so good in the living room!

Here's a sneak peek at what we've done so far:


Tuesday, September 17, 2013

Chair Love

The task of taking out over 2,000 staples is the worst summer afternoon activity I can possibly think of. But my mom and I set out to change the fabric on an office chair that I rescued from my old office space and had no choice. It wasn't so bad because any opportunity to do something awful while laughing with my mom, is a welcomed one.

The chair was handcrafted by a California furniture company called Schafer Bros. and covered in a "smoky quartz" polyester wool fabric. Since it is an office chair, it sits on a reclining brass mount that rolls on black casters. When we found it, the condition of the fabric was awful, but it had a great shape and had lots of potential to be fun and functional. We dragged it through the move to our new place and I just have to get it done before my birthday party. After assisting in the search for an affordable quote, my mom volunteered to help me do it on our own. It wasn't our first time at the rodeo, but we had no idea what we were in for. Thankfully, once we got inside, we realized it had great bones which was a relief. I think the worst part has been taking it apart and fighting with my mom's sewing machine. I've been sewing since I was a kid, but have always had trouble with front mount bobbin machines which, of course, is the kind my mom owns. I own a drop mount bobbin machine that I, of course, had left at home: 10 miles away. Either way, I'm pretty impressed (not surprised) by our success so far and hope we can finish it off without an issue. Photos of the final product are coming once its done tonight or tomorrow morning.


Yes, I chose a bright orange with off-white polka dot fabric! It seemed like the most perfectly silly print to cover an old chair in. It'll also bring some fun into our neutral bedroom.

BEFORE


Thursday, September 12, 2013

Postcard Pouch Favors

For some reason, I've been having a hard time figuring out what to do for party favors. After a few ideas came and went, I finally let the materials decide what they wanted to be. I had some leftover light weight muslin fabric and decided to make pouches. Mind you, I had no idea what to put in them at the moment, but decided to make them with a wide enough opening and depth for a variety of items. I cut the fabric in strips of 13" by 6", folded them in half and ironed the crease. 


Then I selected some colored thread to give the seams some life. I split the pile in half and decided on gold with fuchsia and gold with turquoise. I also wanted to add some more interest so I used different types of stitches. 


The gold thread got a straight line and the pink and blue got a tiny zig zag.


Once constructed, I used a stamp to decorate the center of the pouches. I found the stamp after a "draw my own stamp" trial and error session. I just wasn't getting the right vibe from my own ideas. Thankfully, I found it in a stamp that mimics a used postcard. Didn't know it was what I wanted until I saw it. I went with two colors for the stamping as well. The pouches with pink stitching got stamped with a tangerine color and the blue stitching got kelly green.


As usual, the project took over my dining room table as I have yet to decide on a spot for a proper work area.

A few days later, I decided that I will make some key lime melt-away and strawberry shortbread cookies to fill the pouches with. The initial indecision on every aspect of these favors has become very apparent to me as I write this post. It's probably a good thing. I bought some glassine bags so that all the cookie goodness would not seep through the light fabric while we're dancin' the night away.

With that said, I'm excited to have some friends over this weekend. We're going to be making some snack bags for an event our undergraduate sorority sisters are hosting. I hope this little craft/bake night will be the perfect opportunity to test out my recipe.


Jonsi kept me inspired.

-photo of album cover courtesy of www.jonsi.com-

Thursday, August 29, 2013

I'm Not, But I Guess I Am

I don't consider myself to be much of a graphic designer. I can do anything with a brush or pencil, but it's probably because of those abilities that I feel like I lack vision with software. With that said, I've always tried my best and, at times, have made some pretty cool stuff. I'm particularly proud of the invite I created this week for my 30th birthday party that's coming up next month. I had a theme in mind and tried to focus on the essence rather than a literal interpretation. I feel like this instance in particular called for this approach because I wanted to evoke a time and place. The only bit that didn't originate from me is the background which I pulled from one of at least twenty different google searches.


I blocked out some details because, c'mon people, it is the internet.

Also, I've been trying to put together a soundtrack for the party. Well, two soundtracks; a theme-following lounge-y one and an after party one that's more current. I've got tons of Cuban son and big band stuff for the former and stuff like The Naked and Famous and the Two Door Cinema Club for the latter. 

I love hosting events for other people, but not for myself--there's just too much pressure and no one else to blame if things go awry. I'll be posting more about the party this month and next so stay tuned for more of that.

-background photo for the invite courtesy of www.berea.edu-

Monday, August 19, 2013

I Think I've Gotcha

The 1920s party came and went and I wanted to go over what transpired in my have-to-find-a-costume-for-this-party dilemma. I did go to a few fabric stores as I mentioned and that only made things worse. I came across some interesting and ornate details that I could use with some fabric that my grandmother had intended to make me a dress out of before she passed. I bought a few things including but not limited to fur, fringe and wine colored velvet. When I got home I proceeded to set up the sewing machine (it stays tucked away in a closet because I don't have a proper work station yet), clear the dining room table for cutting and measuring, close the blinds so I can try it on freely, etc. There were no witnesses to this madness as my boyfriend had gone to NY for business the day before and wouldn't be home until that night. The most important thing about the last statement is that I had no one to run my edits by. I made a box dress (as taught by my grandmother and my usual "watch and learn" technique). I cut and sew, and cut and sew, and tried it on in between every move. None of this mattered because what I didn't realize before or during the making of this amazing dress (in my mind it was spectacular), is that I've got too much hip for this type of dress. I have never liked straight boxy dresses on myself ever and today would be no exception. I tried to reason with myself for about half an hour before I gave up, cleaned everything up and put it all away. All of the embellishments stayed intact yet ineligible for return because they were cut to size for me at the store. These will be saved for another project. Here's what I ended up choosing from my personal collection. I bought this romper from Anthropologie during their awesome holiday sale this year:


I wore black patent round toe pumps that had a thick heel (I'm only 5'6" so it's a very long pant on me, unlike on this statuesque model) and it was a hit. I curled my hair (as in curled, pinned, set, etc.) and created waves then pinned it up to mimic a bob. The make up was heavy but romantic eyes with dark mauve purple, taupe, champagne highlight and black liner. I used a brighter red than I would've wanted, but couldn't rationalize buying a vampy wine color just for this. I regret this now because a) it would've looked great and b) after giving it some thought, I would totally wear it again. Anyway, the party was lots of fun. There were some who showed up in store-bought costumes, some in homemade ones like a friend's boyfriend who came as a moonshiner wearing a flannel shirt, overalls, a gypsy farmer looking hat and a mason jar for his drinks and the rest of us had some kind of interpretation manifested somewhere on a fancy outfit. 

Next day was clean-up day. I volunteered to help because the party was held at my friend's parent's house and I've always enjoyed being with them even in 95 degree weather trying to get feathers out of the grass.

With my boyfriend gone, I made the weekend a staycation and had an amazing time with just the girls. Hope you're weekend was awesome too!

-photos courtesy of www.anthropologie.com-

Friday, July 12, 2013

Anxiety Over a Snack; Having One and Being One

Sandy and I went back into the wild yesterday. A trip to Everglades National Park hopefully makes for an entertaining and scenic post: 


Open road in Redland, Florida


We took the dark red road in the center of the map (the only road in this area).


Everglades National Park visitors center.

Beware of panthers crossing.

Vultures attacking their own reflections at the parking lot for the Royal Palm Trail. If there's anything you learn from this story, it's that vultures hurt cars and prefer the shade. You should leave your car far, far away and in the sun. Once our car was safe, we had to decide on a path for getting to the visitors center. The options were a) run through bee infested grass or b) run underneath vulture infested tree branches. We went with the vultures. I hate bees.


This decision was easy. The entrance to Gumbo Limbo was flooded with vultures flying around making barking sounds.

Royal Palm Trail visitors center

Where we heard the first alligator snort.

Taken right around the time we got attacked by wild and furious swamp flies.


First alligator sighting. I was filming the water rippling and trying to capture some wild sounds when I spotted him (for the purposes of this post, the gator is a male). Sandy was turned the other way, looking at an apple palm. Still filming, I turn to look at Sandy and whisper-yell, "Sandy, there's an alligator," as I point at him floating toward us. 

Just shy of the boardwalk that we're standing on.

Coming out from under it and measuring at least 9ft long.

Some underwater life.


Alligators resting in the shade. Another situation where a whisper-yell seemed like the best option for us as they were laying inches from our feet. This time it was Sandy who my smacked my arm and said something like "Oh no no no, ha ha ha, no. They are right there."


Thought this sign would help give context for the previous two.

As we're walking back to the entrance, Sandy warned a group of Asian tourists about the alligators under the boardwalk. Seconds later, you hear the woman scream and a splash. We laughed and ran through the swamp fly area so we wouldn't get attacked again. Once we were past the threshold, I took out my snack and asked Sandy if she thought I would get attacked by a bird wanting my food. This is where the title of this post was born.

Entering Mahogany Hammock Trail.


Attacked by swamp flies once again, we decided to run back and come back to the wild during the dry season (winter).

On our way out of Redland, we decided to stop in at Robert is Here. Family owned and operated for 60 years, the stand began as a vacant corner with a young boy selling his father's crop. Look it up. Highly recommend the strawberry key lime shake and local sauces/honeys/jams/juices/pies/you name it.